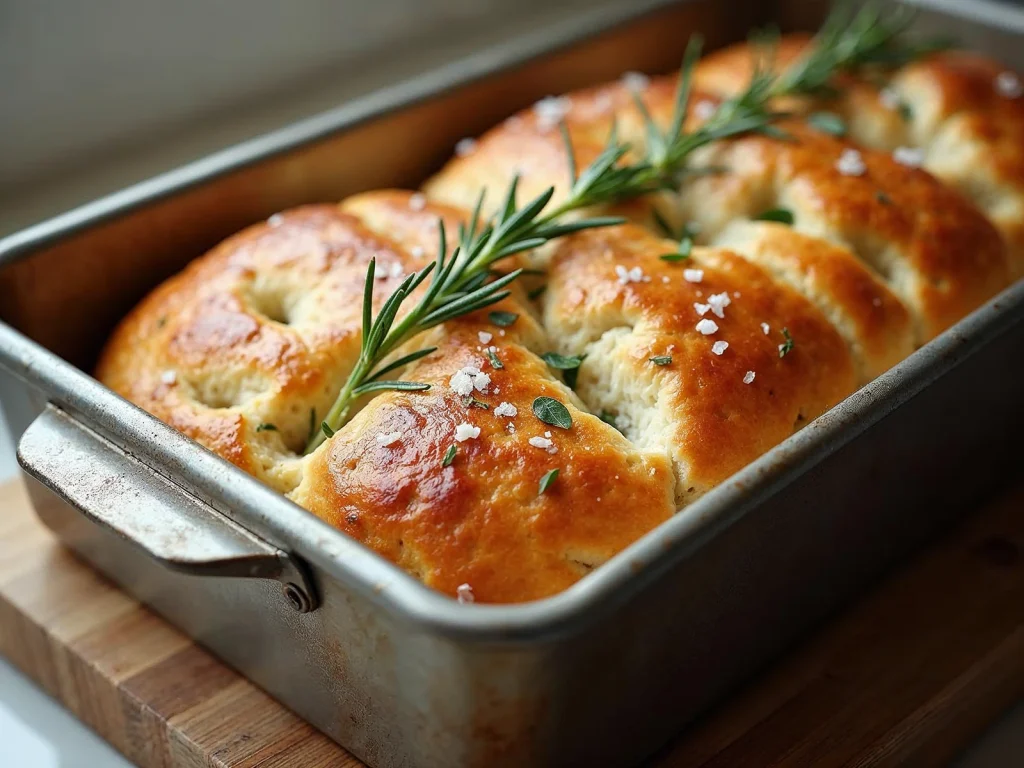
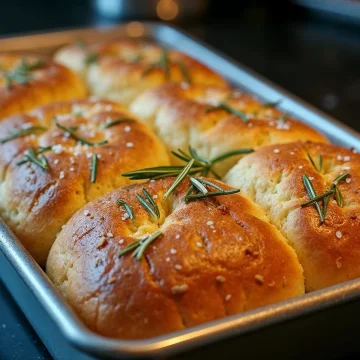
If you’re craving bakery-style bread with minimal effort, this Focaccia Bread is your new go-to. Light, airy, and infused with olive oil, garlic, and fresh rosemary, it’s a flavor-packed side that easily steals the spotlight. With its crisp golden crust and pillowy interior, this no-knead wonder is just as perfect for snacking as it is for building gourmet sandwiches. 😍
Even better? It requires no fancy equipment or complicated folding techniques — just a long rise and a hot oven. Whether you’re serving a crowd or just treating yourself, this focaccia is the definition of homemade comfort. ✨

Why You’ll Love This Focaccia 💡
✅ No-knead method – Minimal hands-on time
✅ Crispy crust, fluffy center – Perfect texture every time
✅ Customizable toppings – Go classic or get creative
✅ Freezer-friendly – Enjoy fresh bread anytime
✅ Elevates any meal – From soups to sandwiches to charcuterie 🍷
Ingredients You’ll Need 🛒
- 1 ½ cups warm water (105–115°F) – Activates the yeast 💧
- 2 teaspoons honey or granulated sugar – Feeds the yeast, adds subtle sweetness
- 2 ¼ teaspoons active dry yeast (1 packet) – Gives rise and structure
- 3 ½ cups all-purpose or bread flour – For the perfect chewy texture (420 g)
- 4 tablespoons olive oil, divided – Rich flavor and golden crust 🫒
- 1 teaspoon salt – Enhances flavor
- 1 tablespoon fresh rosemary, chopped – Classic herbal finish 🌿
- Flaky sea salt, for sprinkling – Adds crunch and a gourmet finish
✨ Optional Toppings:
– Cherry tomatoes 🍅
– Kalamata olives 🫒
– Caramelized onions
– Roasted garlic
– Shredded Parmesan 🧀
How to Make Focaccia Bread 🧑🍳
Step 1: Activate the Yeast
In a large mixing bowl, combine warm water and honey (or sugar) and stir until dissolved. Sprinkle in the yeast, stir gently, and let sit for 5–10 minutes. The surface should become foamy — a sign that your yeast is alive and ready to rise.
Step 2: Mix the Dough
Add flour, 2 tablespoons olive oil, and salt. Stir with a wooden spoon or spatula until a sticky dough forms. Mix for another minute to fully combine. The dough will be very tacky — perfect for fluffy focaccia.
Step 3: First Rise
Cover the bowl with a clean towel and let rise at room temperature for 1–2 hours, until doubled in size and jiggly. Warmer kitchens may rise faster.
Step 4: Transfer to the Pan
Generously oil a 9×13-inch baking pan with 1 tablespoon olive oil. Oil your hands and gently transfer the dough into the pan. Stretch it toward the corners, then cover and let rise a second time for 45 minutes.
Step 5: Preheat & Dimple
Preheat oven to 425°F (220°C). Once risen, use oiled fingers to press deep dimples all over the surface. Drizzle the remaining tablespoon of olive oil over the top and sprinkle with rosemary and flaky sea salt.
Step 6: Bake
Bake for 22–26 minutes, until the top is golden brown and edges are crisp. Let cool in the pan for 15 minutes before slicing.

Optional Garlic Butter Finish 🧄✨
Want to elevate your focaccia even more?
- While the bread bakes, melt 2 tablespoons butter and stir in 2 cloves finely minced garlic.
- After 15 minutes of baking, remove the bread and brush the garlic butter generously over the top.
- Return to the oven and finish baking for 7–11 more minutes, until golden and fragrant.
- Cool slightly, slice, and enjoy the buttery aroma and depth of flavor!
Serving Suggestions 🍽️
- As a side for soups, stews, or pastas 🍝
- For sandwiches – slice horizontally and fill with meats, veggies, or cheese 🥪
- With dips – like olive oil & balsamic, whipped feta, or pesto
- As an appetizer on charcuterie boards
- Topped with eggs or avocado for a savory breakfast twist 🍳
Storage & Reheating 🧊
- Room Temp: Wrap and store up to 2 days
- Refrigerator: Keeps fresh up to 5 days
- Freezer: Slice and freeze for up to 2 months
- To Reheat: Bake at 350°F for 5–8 minutes or toast slices for crispy edges
FAQs About Focaccia Bread ❓
Q: Can I use instant yeast instead of active dry?
A: Yes — no need to proof, just mix directly with the flour.
Q: Can I refrigerate the dough overnight?
A: Absolutely! Refrigerate after the first rise. Bring to room temp before baking.
Q: Is bread flour better than all-purpose?
A: Bread flour gives a chewier texture, but both work well.
Q: Why is my dough so sticky?
A: Focaccia dough is meant to be sticky! Oil your hands when handling.
Q: Can I make it gluten-free?
A: Yes, with a 1:1 gluten-free flour blend, but the texture will differ slightly.
Final Thoughts 🫓💬
Focaccia Bread is the kind of recipe that instantly transforms your kitchen into a rustic Italian bakery. With its crispy golden edges, fluffy center, and aromatic olive oil crust, it’s the definition of comfort in every bite. 🌿
What makes this version so special? It’s easy, flexible, and forgiving — no kneading, no fancy steps, just simple ingredients and a little patience. Whether you keep it classic with rosemary and sea salt or add roasted veggies, cheese, or garlic butter, it always delivers on flavor and texture.
This bread isn’t just a side — it’s an experience. Tear off a warm corner, dip it in olive oil, or layer it with your favorite sandwich fixings. However you serve it, you’ll want to make it again (and again). And with how beautifully it freezes and reheats, you can always keep a bit of homemade bakery magic on hand. 🧡
Short version
Focaccia Bread
Ingredients
- 1 ½ cups warm water 105-115°F
- 2 teaspoons honey or granulated sugar
- 2 ¼ teaspoons active dry yeast one ¼ ounce packet
- 3 ½ cups all-purpose flour or bread flour 420 grams
- 4 tablespoons olive oil divided plus more for greasing hands
- 1 teaspoon salt
- 1 tablespoon chopped fresh rosemary leaves
- flaky sea salt
Instructions
- Pour warm water into a large mixing bowl and stir in the honey until it fully dissolves. Sprinkle the yeast over the mixture and stir gently to combine. Let the mixture rest at room temperature for about 5 minutes. You should start to see bubbles or a thin layer of foam forming on top, which indicates the yeast is active and ready to use. If the surface remains flat with no bubbling, it’s best to discard the mixture and start fresh, as inactive yeast will prevent your dough from rising properly.
- Add the flour, two tablespoons of olive oil, and one teaspoon of salt to the bowl with the yeast mixture. Use a wooden spoon or a flexible spatula to mix until a rough, sticky dough comes together. Continue stirring and folding for another minute to help the ingredients fully integrate. The dough should feel quite tacky and soft at this stage, which is ideal for creating a fluffy and airy focaccia texture later on.
- Cover the bowl loosely with a clean kitchen towel and leave it to rise at room temperature for 1 to 2 hours. The dough should double in size and look noticeably puffier. Rising time may vary depending on how warm your kitchen is, so keep an eye on it rather than relying solely on the clock.
- Prepare a 9×13-inch baking pan by greasing the bottom and sides thoroughly with one tablespoon of olive oil. Metal pans usually provide a crispier edge, but glass pans will work just fine too. Lightly oil your hands to prevent sticking, then gently transfer the dough into the pan. Stretch the dough toward the corners without tearing it. If the dough is springing back and won’t stretch easily, let it rest for about 10 minutes, then try again.
- Cover the pan with a clean towel and let the dough rise again for 45 minutes. During this second rise, the dough will continue to puff up and develop a soft, airy structure that’s perfect for baking.
- While the dough finishes rising, preheat your oven to 425 degrees Fahrenheit so it’s fully hot by the time you’re ready to bake.
- Once the dough has risen, use oiled fingers to gently press dimples all over the surface, pushing your fingertips down to the bottom of the pan. Drizzle the remaining tablespoon of olive oil across the top and sprinkle generously with fresh rosemary and flaky sea salt. This will give the focaccia its signature flavor and rustic look.
- Place the pan in the preheated oven and bake for 22 to 26 minutes, or until the top turns golden brown and the edges become slightly crisp. Remove the pan from the oven and let the bread cool for at least 15 minutes before slicing. This short cooling period helps the texture settle so each piece holds together nicely.
- Focaccia is best enjoyed warm on the day it’s made, with its crust still crisp and the center soft and pillowy. However, if you have leftovers, you can reheat individual slices in the oven for a few minutes to bring back some of that fresh-baked magic.
Notes
While the focaccia is baking, melt two tablespoons of butter in a small saucepan or microwave-safe bowl. Once melted, stir in two cloves of finely minced garlic. This quick garlic butter adds a rich, aromatic layer of flavor that pairs beautifully with the bread’s soft texture.
After 15 minutes of baking, remove the focaccia from the oven and immediately brush the melted garlic butter generously over the surface. If you like, sprinkle fresh rosemary over the top at this stage, along with a pinch of flaky sea salt for added texture and flavor.
Return the focaccia to the oven and continue baking for another 7 to 11 minutes. Keep an eye on it—the bread is ready when the top turns a warm golden brown and the edges are crisp. Let it cool slightly before slicing to enjoy the full depth of flavor.